Portrait Lighting
Basic lighting setups haven't changed for over 100 years (or since
we could have indoor lighting for photography). The nice thing
about digital is that you can experiment to your hearts content,
seeing the results immediately, but the first thing you'll learn
eventually are these standard lighting concepts:
You need a key, or main light, which is just what it
sounds. It provides the primary light source for your image,
and should be the only one which shows definite shadows (if you have
more than one shadow source in your image it will look confusing and
amateurish).
You usually need a fill light, which simply reduces the contrast
between the main light and the shadow areas of your image.
This light is never brighter than your key (or it would be
the key) and is usually not as bright (or you would have flat
light).
You may or may not have a hair or accent light. This light,
aimed from the back, lights the back of the head to provide
separation of the head from the background. It's pretty trite
nowadays to have such a light, but it has become a cliché because
it's effective.
You may or may not have a background light, which lights the
background (duh). You'll need this if your background needs to
be lit (you don't want a dark or black background) and your key and
fill lights do not provide enough light (they usually won't).
So at the very most you'll need four light sources, but usually
you can work just fine with two or three (and sometimes you can get
by with one). Also note that reflectors and/or natural sources
(like the light from a window) can substitute for one or more of
these lights. So if you only have one flash you can still
produce nice portraits (it just requires a little more effort).
How
they work
Let's see these lights in action. First we'll discuss how
to place our key, or main light. Usually you'll want to
position this high, high enough that the shadow cast by the nose
comes down to just touch the upper lip (however, you don't need to
put it this high if room and/or your lighting stands don't permit
it).
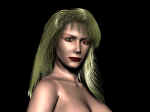
The next issue is where, to the side, you want to put the
light. There are three distinct places -- directly in front of
the model, to the short side and to the long side of her face.
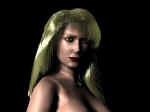
 Placing the light directly in
front of the model gives you much the same kind of lighting you
would get if the flash were mounted on the camera. The only
difference is the light is a lot higher, so we see shadows coming
down, but the light itself is pretty harsh and unattractive to the
face. We'll discuss how we can use this light later on.
Placing the light directly in
front of the model gives you much the same kind of lighting you
would get if the flash were mounted on the camera. The only
difference is the light is a lot higher, so we see shadows coming
down, but the light itself is pretty harsh and unattractive to the
face. We'll discuss how we can use this light later on.
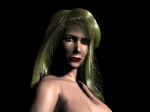
 Placing the light so that it
illuminates the broad side of the model's face is even worse in most
cases. It's the usual mistake a beginner makes in portrait
photography. The problem is that with the light on this side
of the face it makes the model's face look wider, which is not
usually what you want to do. Unless your model is Calista
Flockhart it's not recommended to use broad lighting.
Placing the light so that it
illuminates the broad side of the model's face is even worse in most
cases. It's the usual mistake a beginner makes in portrait
photography. The problem is that with the light on this side
of the face it makes the model's face look wider, which is not
usually what you want to do. Unless your model is Calista
Flockhart it's not recommended to use broad lighting.
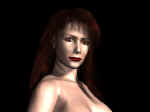
The third option is placing the light so it illuminates the short
side, or the side of the face away from the camera. This is
called, naturally enough, short lighting, and is by far the
preferred lighting of portrait photography. It makes the face
slender and is very flattering for nearly everybody. Note that
the model faces the light, turning her face slightly away from the
camera (for a real person have him or her look with their eyes at
the camera as their face is turned away).
Now that we have our key light placed, the only thing that
remains is to fill in the shadows to our liking. Traditionally
the fill is mounted behind and above the camera position. If
you are using the EOS wireless flash system you can set the ratio
between your fill and key lights quite easily. Here are two
typical ratios:
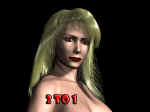

If you want a hair or accent light you can add one behind the
model, pointing at the top of their head. You must be careful
that this light does not shine into the camera, nor do you want it
to illuminate anything other than the hair. Studio lighting
systems use barn doors (devices which fit over the lights to limit
where they shine -- they look just like the doors on a barn) to
control just where the light will go. Done correctly the light
does add a nice touch, although some folks (like myself) feel it's a
little artificial looking. In order to see what this looks
like we need to see a subject with dark hair, as our blonde already
stands out from the background.

The only other thing that remains is to light your
background. If your subject is quite close to the background
your key and fill lights may do a good enough job. Otherwise,
a dedicated light aimed at the backdrop will fill it out nicely.
But
softly
Once you have the basic concepts down you are free to break the
rules as needed. We mentioned that light shining directly into
your model's face -- if you can diffuse the light enough you can end
up with one of the most flattering of all portrait shots. This
requires a lot of diffusion, because you want to eliminate
nearly all shadows, and you need the light to "mold"
around the model's face to keep her from looking as fat as Louie
Anderson. Shooting through a white umbrella will do the trick,
as will the various softboxes and moon lights available.
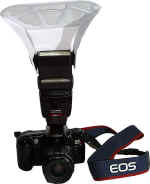
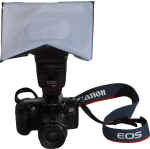
If you only have one flash and you need to keep it on camera you
can buy the devices by Lumiquest to soften your flash output.
These are the "poor man's" umbrellas, and while they will
do in a pinch they are no substitute for using umbrellas and real
soft boxes. If I have to use on-camera flash (like at a party
where I'm just doing candids and available light isn't an option) I
use these. They are also good for softening fill flash
outdoors, where the sun is your key light.
And if you are in a situation where you only have the one
umbrella and/or one light stand, if you have the 550EX you can put
it on the camera as both your fill light and your trigger for your
other flash mounted on the stand. Use the Lumiquest stuff to
soften your fill and you have a little "mini-studio"
that's easier to work in crowded rooms (used this way don't forget
to reverse your 550EX ratios so that the on-board 550 is set for lower
output than your stand mounted key light flash).
Finally there are all the wonderful things you can do with
putting various colored gels or filters on your flash units.
Lumiquest makes a gel holder, complete with gels, that allows you to
get very creative. As a rule you'll want to use these  only on your accent and/or
background lights but if you want to go wild there's no one stopping
you. If you are tempted to put gels on your key and
fill lights, remember a rule of thumb from theater is to mix both
"hot" and "cold", so that you might have a warm
gold light as your key, and a cool blue light as your fill.
Mixing colored lights like this may not prove flattering to your
models, but it might win you awards.
only on your accent and/or
background lights but if you want to go wild there's no one stopping
you. If you are tempted to put gels on your key and
fill lights, remember a rule of thumb from theater is to mix both
"hot" and "cold", so that you might have a warm
gold light as your key, and a cool blue light as your fill.
Mixing colored lights like this may not prove flattering to your
models, but it might win you awards.