![]()
![]()
![]()
![]()
![]()
![]()
![]()
![]()
![]()
![]()
|
|
|
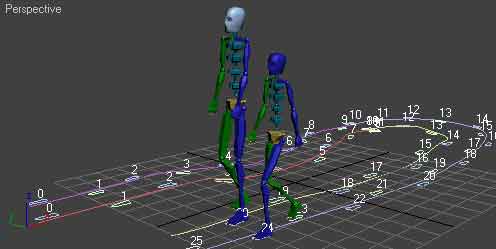
Biped Footstep Utility (3D Max)Biped is one of my favorite Max tools -- it ain't the greatest rigging system in the world but it's fast, easy, and extremely powerful. Combined with Skin you have the perfect character system, and the Mixer (introduced in Max 8) makes it possible to do almost anything you'd ever need to do with a biped animation. There are two distinct ways of animating with Biped, and the first one is by using Footsteps. It's the first thing most users learn and the first thing they quickly abandon as they bump up against the limitations. Which is too bad, because Footsteps make walking, running or jumping a piece of cake. The two basic problems with footstep animations are they are fairly sterile, and they are hard to get exactly in the paths you need. There are many ways to solve the first problem (and we'll examine some of them) but not too many ways to get around the second -- which is where my script comes in. You can add footsteps to your biped in two different ways (amazing how these things always break down into two :>): you can add them one footstep at a time, or you can use the automatic add multiple footsteps. In either case the tools for manipulating footsteps are a PITA. Either you painstakingly add your footsteps one at a time precisely where you want them (including what height you want them) or you take multiple ones added in a straight line and try and edit those individual to fit which way you want your biped to go. I was trying to create an animation where two bipeds were walking along together and trying to make it less sterile by having one of them walk faster than the other and have to wait for the other to catch up, as well as walking not in lock step but kind of in and out the way actual people do. If you've ever tried this you'll quickly see how difficult it is to get it right without extensive editing. I thought there had to be an easier way... and I was right. With my script not only can you do this kind of thing in literally a minute, but you can also generate complex paths including those which follow the terrain quickly and easily and with a minimum of fuss. Why this kind of functionality hasn't been built-in to Max long before now I have no idea, but thanks to Maxscript we can do whatever we want or need. While all the sample scenes are done in Max 9 (and won't open in earlier versions) this script ought to work at least on Max 8 and perhaps even 6 and 7 (it all depends on when they allowed Maxscript to do some of these tricks). So if you have an earlier version it won't hurt to download the script and give it a try. (Oh, and the usual disclaimers apply: if you use this script and your machine blows up, your dog dies, and your wife leaves you I am in no way responsible. Well, maybe the wife part, but that's tough). Biped to Path Script Example Tutorials Let's go walkies!The first scene was my classic problem: how to get two bipeds to do a walk and talk with each other without looking phony.
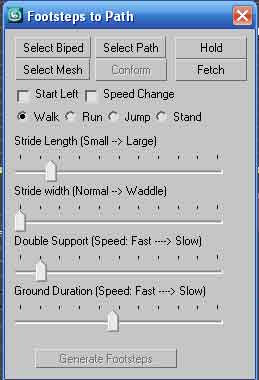
First some housekeeping: you'll need to evaluate the Maxscript macro so you can access it via a shortcut key or button. You can do this a number of ways, but the easiest is to put it in your startup scripts folder. Or you can just open it up and run it (it won't do anything, though, so don't panic!). After you have it evaluated you can access it by going to Customize/Customize User Interface and in Category choose "Systems". It should be the only thing there (unless you've been busy :>). You can assign a shortcut key to it and I would recommend you use Shift-B (which is not otherwise assigned normally). Now anytime you press that combination the amazing utility will pop up.
If you open up the test scene "TwoGuysWalking" you'll see a few lines drawn -- if you can't open the scene up, create your own. Lines are how we tell the bipeds where to walk, and can be created in three dimensions (so your biped can go up and down mountains and staircases as well). The only "trick" is that each line can only contain one kind of motion behavior (walk, run or jump) so if you want your biped to change behaviors (or speed up and/or slow down) you need to create separate lines for this. And each line should overlap somewhat -- this isn't strictly necessary, but it will keep the biped from having to jump or fly to the next set of lines <g>.
Now all we need is a biped or two so create away. Remember that the height of the biped will determine how many steps they will take (based on their speed) so don't think you can create a set of footsteps for Robin Williams that your King Kong character will be able to use. For the purpose of this exercise it will be nice if one character is larger than the other as that will change the stride naturally, so let's make one about 6 feet (72 units) and the other 5 feet (60 units). Now let's start. Bring up the utility (Shift-B if you assigned it that way) and choose Select Biped and pick the first guy (the tall one). Choose Select Path and pick Line01 (it's the inside line at the top of the screen or furthest away in the perspective view). Leave all other settings alone and press "Generate Footsteps". This will generate footsteps for that biped as well as activate them. You can scrub through the timeline and see him follow the path. However, his friend is getting lonely. Choose the second biped by pressing the button that has the name of the first biped in it and select his friend. Then choose line02 as the second path (it's the outer line at the top of your screen) but don't do anything else. Because it's hard to predict timing of footsteps given the number of variables we have (biped size, biped gait, speed of walk, distance traveled, etc.) many times you will find it necessary to experiment and change things. The easiest way to do this is to hold your scene and then fetch it back if you didn't like the changes. You can use Max's hold and fetch to do this but we have buttons right here on the rollout for the same purpose. So go ahead now and select the Hold button. Now go ahead and generate the footsteps for the second biped. If you scrub the timeline you'll notice a couple of things. Depending on whether you drew your paths or used the test scene, the second biped may have started walking on the same foot as the first. And even though the bipeds are of different heights, and are not traveling the exact same path, it is near enough that they don't look quite natural. We'll fix that right now. Press the Fetch button and answer Yes to fetching the scene back. You'll have to start back up the utility but just press Shift-B and there it is. Select everyone again and if your second biped used the same foot as the first you can fix this by check marking the "Start Left", which will then have that biped starting with their left foot instead of right. It's up to you. More importantly, we want to adjust the speed of the walk. Adjusting the Ground Duration higher is the best way of doing this (you can also adjust the amount of time both feet are on the ground, but I would not use this unless and until you become more familiar with how the footsteps work). Turn it up a bit -- not all the way, but a few notches more. Then generate footsteps again. The big guy should outdistance his smaller friend. In my particular timings (yours will most likely differ) Mr. Big is through and waiting for his friend at about frame 139 and his friend doesn't catch up until 215 or so (you can scrub through the timeline and see when each stops). In my case I need to have Mr. Big wait for about 90 frames, or 3 seconds, until his friend is with him before he starts walking again. So I will select him and choose "Stand" instead of Walk. The sliders will change because all you can do with stand is tell it how long. In this case the slider is in seconds, and defaults to 3 seconds so I'll leave it alone. Then I first select hold (very, very important!) and then press generate footsteps. Depending on circumstances (once again, different line lengths, etc.) Mr. Big may appear to be waiting for his friend just fine. Or he may suddenly decide to break the old Olympic record of standing high jump by launching himself into the air and coming straight down. If the latter you will need to fetch your scene and try again only this time check mark the "Start Left" box. If you are going back and forth between characters like we are sometimes, just sometimes, the footsteps will be on the wrong alternation. As a rule they will alternate back and forth, left and right, just like in real life. This is kept track of by a global variable, so if you switch bipeds sometimes the previous biped stopped on a left and now you are on a biped who stopped on a right. You enter another right footstep... and he jumps into the air because he can't figure out what to do. So if your bipeds ever start leaping like lizards (or even just hopping strangely) when doing an additional animation, just check the start left (or uncheck it if you had it checked) and try again. Which is why with every major operation you should always do a Hold. So now let's start Mr. Big walking again. Choose Line04 and accept the defaults and generate footsteps and then go back to his small buddy. Do a hold (naturally) and choose line03. This time the little guy has to walk all around the long way, so let's speed him up. Adjust Ground Duration until it's about in the middle and generate footsteps (for my effort I needed to check "start left" or he hopped off a little oddly). When you're done you should see two bipeds walking along very naturally. The big guy waits a bit while his smaller (younger?) friend catches up but the young guy speeds up to stay with him as they walk the rest of the way. My results are saved in "TwoGuysWalkingFinished". Climb Every MountainIf you load in the scene "MountainClimb" we'll see what else this script can do. In it we have what amounts to more of a molehill than an actual mountain, but to our little biped this is something difficult to climb indeed.
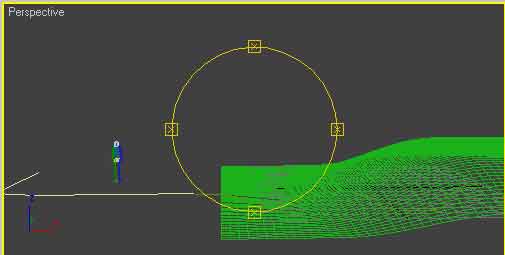
Bring up the utility (Shift-B) and choose the biped and the line01 as the path. Choose "Run" and then generate some footsteps. Now hold and generate a standing still period of four or five seconds as our little fellow catches his breath before he begins his climb. The path to climb is Line02, but in drawing it we didn't take into account the "mountain" mesh. It would be difficult and time-consuming to try and fit that line to the mesh manually, but luckily we don't have to do that. Select Line02 as the path and then use the Select Mesh button and select Plane01. A new button, Conform, will now be available to you. Do a hold and then press Conform. It might be difficult to see (you may want to pan around in the Perspective viewport with Line02 selected) but Line02 has been "conformed" to fit the contours of Plane01. Actually, two things happened -- more vertices were added to each segment, and then each vertex was moved to the z level of that conforming mesh. Now change the selection back to a walk and raise the default speed slightly by dragging the slider over to the left a few notches. Now, it's going to get harder and harder to climb that mountain, so let's checkmark the "Speed Change" box. Whenever you check "Speed Change" the current value of the Ground Duration will be stored as the starting value. Then whatever you change it to will be the end value of the motion. So in this case after we check the box we want to drag the slider again, but this time all the way over to the right. Generate footsteps and when you're done play the whole thing back in the perspective viewport. Our guy will jog up, pause a bit, and then climb all the way up the huge mountain, going slower and slower, until he finally reaches the top in triumph! More To ComeI've got plenty more to write about using this, particularly in connection with the Mixer (where you can vary your upper body animations in combinations with these animations to create some very spectacular looking stuff with the greatest of ease) but I'm going to wait to see if anyone is even interested in this stuff. If you think it's worthwhile and find it useful drop me a line here and I'll be sure to continue. A few observations, though. Footsteps are not the end of the animation cycle by any means, and even these generation of footsteps aren't the end of footstep editing. You may find that you will need to move a footstep here or there, or adjust the length of something to fit a particular need. And generating a little more personality in our walks and runs is very important. That's okay -- this script is designed to give you the basic foundation that would otherwise take many hours to get right. And that will leave more time for the "tweaks" that will make the animation come alive. If you have any other ideas about what you'd like to see this do let me know -- I plan on using it nearly every day and I'm sure to be adding stuff to it from time to time. But it's already saved me a ton of time even including the time necessary to program it. I hope it does the same for you.
|